6 Plasma Cutting Projects for Beginners
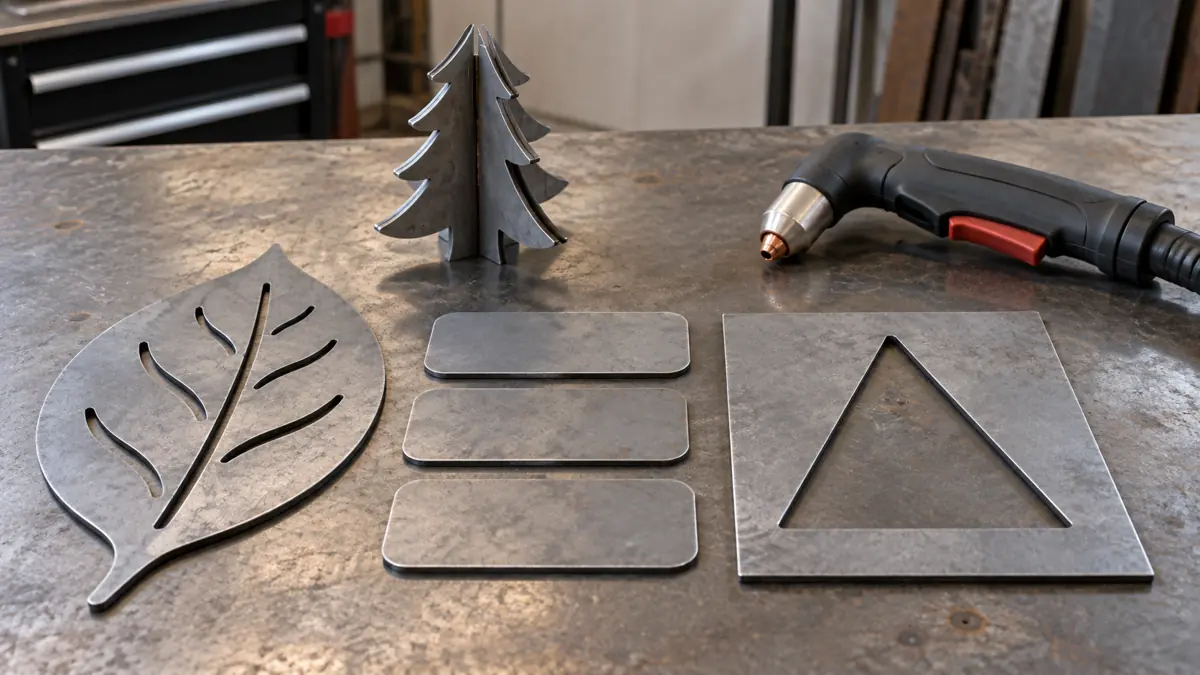
Good beginner plasma cutting projects have a simple outline, accessible cuts and a result you can finish without relying on tight tolerances or structural strength. Start with a straight-edged practice tile, then try a garden marker, silhouette, stencil, slotted desk decoration or a set of workshop labels.
The six projects below are suggested learning exercises, not tested fabrication plans. Choose one skill to practise at a time and use identified material within your machine’s recommended cutting range. None of these designs needs to carry a person, hold a heavy load or become part of a vehicle.
Choose a project that suits your cutter
Decide whether you are hand cutting or using a CNC table. Hand cutting makes a broad outline and a guiding edge useful; CNC adds drawing, toolpath and setup decisions. A detailed digital design is not automatically an easy first project.
For the examples here, known uncoated mild-steel sheet is a straightforward starting material. Choose its thickness from your system’s cut chart and the intended finished object, rather than buying sheet solely because it is cheap scrap. Avoid unidentified coated material until its preparation and exposure controls have been established.
Hypertherm’s metal-art guide discusses both handheld and CNC approaches. If you are still comparing equipment, see our plasma versus oxy-acetylene guide.
| Project | Main skill | Extra finishing or tools |
|---|---|---|
| Practice tile | Straight cuts and corner control | Edge cleanup and measurement |
| Garden marker | Long edges and a simple curved top | Surface finish and painted identification |
| Wall silhouette | Following a broad outside curve | Mounting holes and suitable wall hardware |
| Reusable stencil | Interior openings and connected shapes | Flat cleanup and a painting trial |
| Slotted desk decoration | Test-fitting two cut pieces | Measuring, filing and stability check |
| Workshop label set | Repeating a shape consistently | Drilling, marking and mounting |
1. A straight-edged practice tile
Suggested layout: draw a rectangle roughly the size of a postcard. The dimensions are your choice; leave enough room to support and clamp the stock safely. Mark which side of each line is waste.
Make the straight cuts using an appropriate guide if your setup permits it. Measure the cooled tile, compare opposite edges and check whether the corners match your drawing. Finish the edges before handling it as a reference sample.
Keep the tile beside the next one you make. Record material, consumables and settings so you can compare like with like. The useful result is a reference piece that shows whether your movement and layout became more consistent, rather than a scrap rectangle you immediately throw away.
Move on when: you can explain where the cut wandered and repeat the improvement on another piece.
2. A one-piece garden marker
Suggested layout: combine a broad label area and a straight stem in one continuous outline. Draw a rounded top or one gentle shoulder curve. Keep the neck broad enough for the design and avoid tiny decorative points.
This project adds a change of direction without requiring interior piercing or welding. Practise the movement on a spare strip first, then cut the outline. Deburr the whole piece, including the stem, and apply an appropriate outdoor finish if required. Add the plant name with paint or another suitable marking method.
Choose the location with the finished edge shape in mind. This is a decorative marker, not a ground anchor, and it should not create an exposed sharp-point hazard along a walkway.
Move on when: the curved shoulder remains recognizable after cleanup without needing the outline ground into a completely different shape.
3. A broad wall silhouette
Suggested layout: sketch a simple leaf, mountain profile or fish with a generous outside contour. Use your own drawing or artwork you have permission to reproduce. Leave delicate fins, narrow branches and interior details for a later version.
Cut a short section of the most difficult curve on scrap before committing to the full sheet. For a hand-cut piece, decide how you will follow the outline and keep your movement supported. A template changes the path your torch follows; confirm the resulting offset with a sample.
After cutting, remove sharp edges and plan the finish and mounting. Small mounting holes may be better made with a suitable drill rather than forcing an awkward plasma feature. Use hardware appropriate to the wall and the finished piece’s weight.
Keep it simple: a clean silhouette reads better than a detailed design whose thin features disappear during finishing.
4. A reusable stencil
Suggested layout: start with one large symbol or block letter. Draw the metal that must remain connected before drawing the openings. For a letter with an enclosed center, include connecting bridges so the center does not fall out.
Make a paper version first. Cut out the proposed openings and check whether the stencil remains one piece. This catches a design problem before you spend time on the machine. For plasma cutting, size the openings and connections around what your setup can reproduce on a trial coupon.
Plan a safe sequence that keeps the stock supported while the interior features are made. Use the machine’s approved piercing method and respect its piercing capacity. Once the piece is cool and cleaned, try the stencil on scrap material with a suitable marking medium.
Move on when: the finished stencil stays flat enough for its purpose and every intended part remains attached.
5. A two-piece slotted desk decoration
Suggested layout: draw a broad upright silhouette and a flat crosspiece with mating slots. Make this a small display object, such as a simple tree shape, rather than a stand for expensive equipment.
The lesson is fit. Before cutting both decorative outlines, make a small slot-and-tab sample from the same sheet. Measure the actual material and adjust the drawing from the cooled, cleaned test. The cut removes material, so a line on the drawing is not a promise of the finished dimension.
Keep enough material around each slot and allow for safe edge cleanup. Test the assembled decoration on a stable surface. If it rocks, leans or separates too easily, revise the sample or base design rather than trying to hide the problem with a finish.
Move on when: you can repeat the fit without forcing the pieces together or removing large amounts of material afterward.
6. A matching workshop label set
Suggested layout: draw several small rectangles with clipped or rounded corners. Use them as painted identification tags for storage bins or a tool board. They are labels, not lifting tags or load-rated hardware.
Repeat one shape several times and compare the finished dimensions after cleanup. Keep a record of which piece came first so heat, support or movement changes do not get lost in the pile. Use a suitable drilling method for the mounting holes if that gives a more manageable result.
Mark and finish the pieces only after verifying that the edges and holes suit the intended mounting. A consistent set teaches repeatability better than six unrelated scraps because you have a clear comparison.
Move on when: the set looks intentionally matched and fits its mounting arrangement without individual rework.
Set up the cut before starting the project
Use the correct consumables, gas or air supply, work connection and operating parameters for your machine, material and thickness. Secure the stock, leave the cutting path clear underneath and keep the work lead on material that will remain connected.
Hypertherm’s setup guide explains basic handheld preparation and directs users to the operator manual for detailed instructions. Use that manual for cut height, starting and piercing limits; this project list is not a substitute.
Do not assume every torch can be dragged directly on the sheet. The torch and consumable design determine the approved method. Hypertherm’s handheld tips describe features specific to its torch and cartridge system, which should not be generalized to unrelated equipment.
Build finishing into the project plan
Allow safe cooling and handle the cut pieces as hot until confirmed otherwise. Remove dross and sharp edges with appropriate tools and protection. Leave time for this work before deciding whether the shape fits or the project is finished.
If cut quality is poor, check setup, consumable condition, height and travel against your manual before changing several variables. Hypertherm’s CNC cut-quality guide offers a troubleshooting sequence for mechanized systems; its machine-specific parameters are not handheld settings.
Plan suitable eye, skin, hearing and respiratory-exposure controls, ventilation and fire prevention before cutting. Avoid containers, unknown scrap and closed spaces as beginner projects. OSHA’s hot-work guidance covers the main exposure categories. Art projects still produce radiation, fumes, hot particles and sharp metal.
Choose the next project by the skill you need
WeldingPilot project note: write one learning target on the drawing. A straight tile tests line control; a silhouette tests curves; a stencil tests connected geometry; a slotted object tests fit. If the target is still inconsistent, repeat a simpler sample before adding more detail.
For projects that also require welding, use our beginner welding project guide to plan that separate operation. Cutting a usable outline is progress, but it does not establish the strength of an assembled object.
Frequently asked questions
Do I need a CNC table for these projects?
No. Broad outlines and guided straight cuts can suit handheld equipment. Detailed interior features and repeated fitted parts add difficulty; choose the design around the tools and instruction available.
What thickness should I buy?
Match the project, support arrangement and system’s recommended cutting range. Check piercing requirements separately for designs with interior openings. There is no single sheet thickness that suits every beginner cutter and project.
Can I sell the first pieces I make?
First establish consistent finishing, safe edges, appropriate mounting and permission to use the design. Treat these as learning exercises; this guide does not certify a product or predict saleability.