Overlap in Welding
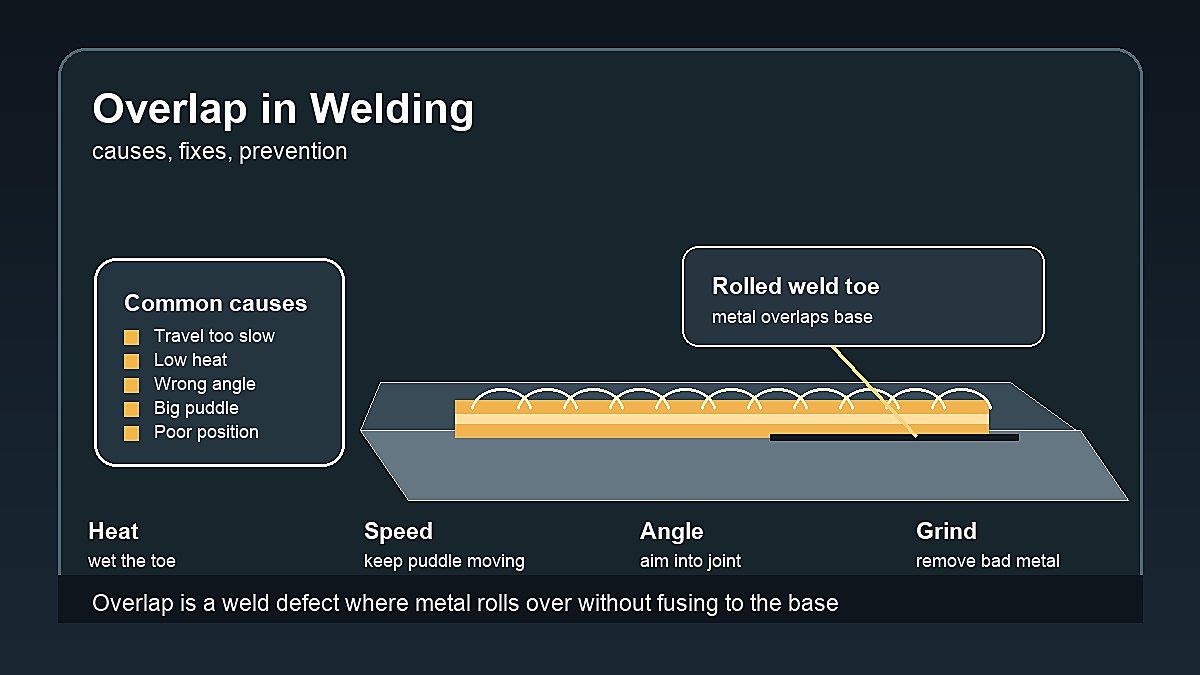
Overlap in welding is a weld defect where molten weld metal rolls over the edge of the weld and lies on the base metal without properly fusing to it. The bead may look wide or heavy, but the edge is not bonded the way it should be.
Beginners often notice overlap as a lip at the weld toe, a rounded bead edge, or weld metal that looks like it spilled onto the plate. It can happen in MIG, stick, TIG, and flux core welding when heat, travel speed, angle, or puddle control is off.
Mark Dawson beginner note: overlap is not just an appearance problem. If the edge of the weld is sitting on the metal instead of fused into it, the joint may have a weak line where stress can start a crack.
Quick Answer
Overlap in welding means weld metal has flowed over the base metal without full fusion at the toe of the weld. Common causes include travel speed too slow, heat too low for the puddle size, wrong torch or rod angle, poor position control, too much filler metal, and trying to carry a puddle that is too large. The fix is usually to remove the overlapped metal, clean the joint, correct the settings and technique, then reweld only if the repair is allowed for the job.
| Symptom | Likely Cause | Beginner Fix |
|---|---|---|
| Rolled bead edge | Travel too slow or cold puddle | Improve heat and move steadily |
| Metal spills over toe | Too much filler or wrong angle | Reduce filler and aim into joint |
| Heavy convex bead | Large puddle with poor control | Use smaller passes |
| One edge not fused | Arc not washing the toe | Watch both weld toes |
| Repeated overlap | Position or settings problem | Practice on scrap before repair |
What Overlap Looks Like
Overlap usually appears at the toe of the weld, where the bead meets the base metal. Instead of a smooth transition into the plate, the bead edge looks rolled, folded, or sitting on top. A fingernail may catch on the edge after the weld cools.
In a good weld, the edge of the bead ties into the base metal. With overlap, the weld metal may have flowed outward without enough heat or arc force to melt the base metal beneath that edge. That creates a surface lip rather than a fused edge.
For the wider defect family, review Common Welding Defects and Welding Defects and Remedies.
Why Overlap Matters
Overlap matters because the edge of the weld is not properly fused. The joint may still look filled, but the unfused edge can act like a notch. Under load, vibration, bending, or impact, that notch can become a starting point for cracking.
On practice beads, overlap is a signal to adjust technique. On structural, vehicle, trailer, lifting, pressure, or workplace welds, treat it as a serious defect. Do not grind it smooth and call it fixed unless the repair method is appropriate for that job.
Overlap vs Lack of Fusion
Overlap and lack of fusion in welding are closely related. Overlap is usually a visible surface condition where weld metal rolls over the base. Lack of fusion may be visible at the surface or hidden inside the joint.
A weld can have both problems. If the toe has rolled over and the edge did not melt into the base, there is overlap with poor fusion at that edge. That is why the fix focuses on removing the bad metal and correcting the cause, not just making the bead look smoother.
Overlap vs Undercut
Undercut is different. With undercut in welding, the base metal beside the weld is melted away into a groove and not filled properly. With overlap, extra weld metal rolls over the base metal without proper fusion.
Both defects happen near the weld toe, so beginners sometimes confuse them. Look at the shape. A groove beside the weld points toward undercut. A raised lip or folded bead edge points toward overlap.
What Causes Overlap in Welding?
- Travel speed too slow, letting the puddle pile up.
- Heat too low for the bead size, so the edge does not wet in.
- Wrong gun, torch, or rod angle.
- Too much filler metal added for the joint.
- Trying to weld a bead that is too large in one pass.
- Poor position control in vertical, overhead, or awkward joints.
- Arc aimed away from the weld toe.
- Dirty metal, slag, mill scale, rust, paint, or oil near the edge.
Heat and Travel Speed
Overlap often shows up when the puddle is too large or too cold to wet into the base metal. Moving too slowly can let metal build up until it rolls over the toe. Running too cold can leave the edge sitting on the surface instead of melting in.
The fix is not always one simple change. A little more heat may help if the bead is cold. Steadier travel may help if the puddle is piling up. A smaller bead may help if the weld is too heavy for the position. Make one change at a time on scrap so you can see what improved the weld.
Angle and Puddle Control
The arc needs to reach the place where fusion is required. If the gun, torch, or rod angle pushes the puddle ahead of the arc, weld metal can roll over cold base metal. If the arc points mostly at one side, the other toe may not tie in.
Watch the front edge of the puddle and both toes. The bead should wash into the base metal. If the edge curls over like a lip, stop and adjust before repeating the same mistake down the joint.
MIG Welding Overlap
In MIG welding, overlap can come from low voltage, slow travel, excessive wire feed for the heat setting, too much stickout, or a gun angle that lets the puddle run ahead. It is common when a beginner tries to make a wide bead before learning toe control.
Start with the machine chart, then fine-tune on clean scrap. Keep the arc directed into the joint and watch whether the toes wet in. For process fundamentals, read MIG Welding Techniques for Beginners.
Stick Welding Overlap
Stick welding overlap can happen when amperage is too low, arc length is long, rod angle is wrong, or travel is too slow. Some rods also make a fluid puddle that needs careful control, especially out of position.
Keep a controlled arc, use the right amperage range for the rod, and avoid piling metal at the edges. Clean slag before judging the bead. For more stick practice, read Stick Welding Basics for Beginners.
TIG Welding Overlap
In TIG welding, overlap may appear when filler rod is added before the base metal is ready, amperage is too low, travel pauses too long, or the torch angle spreads heat away from the toe. A bead can look clean but still have a rolled edge.
Let the base metal wet before adding filler. Keep the puddle small enough to control. If the filler piles up on a cold edge, stop and correct heat or timing. For hand control, review Basic TIG Welding Techniques for Beginners.
Flux Core Welding Overlap
Flux core welding can produce overlap when heat is low, travel is slow, drag angle is poor, stickout is too long, or slag interferes with the toe. Self-shielded flux core can also look rougher, so cleaning matters before inspection.
Use the polarity listed for the wire, set wire feed and voltage from the machine chart, and clean between passes. For related problems, compare overlap with slag inclusion and read Flux Core Welding Tips for Beginners.
How to Fix Overlap
- Stop welding and mark the overlapped area.
- Clean the weld so the edge is visible.
- Remove the defective metal if repair is allowed.
- Grind or prepare back to sound metal.
- Correct heat, travel speed, angle, and filler amount.
- Run a test bead on similar scrap.
- Reweld only under a suitable repair method.
- Use qualified inspection when the weld is important.
Do not only grind the lip flat if the weld needs strength. Grinding can hide the surface shape while the unfused edge remains. A proper repair removes the defect and addresses the reason it formed.
How to Prevent Overlap
Prevent overlap by keeping the weld size realistic, cleaning the joint, choosing suitable settings, and watching the toe of the weld. The puddle should flow into the base metal, not slump over it.
Use multiple smaller passes when one large pass is hard to control. In vertical or overhead positions, reduce puddle size and focus on control. On thicker material, make sure joint preparation gives the arc access to the sidewalls.
Practice beads should be inspected after cleaning, not only while hot. A bead that looked acceptable under the helmet may show a rolled toe after brushing or chipping.
Position Problems
Overlap becomes easier to create when gravity pulls the puddle out of the joint. Flat welds are usually easier to control. Horizontal, vertical, and overhead welds demand a smaller puddle, a steadier rhythm, and a clearer view of the leading edge.
In vertical welding, excess heat or slow travel can make the puddle sag and roll over the lower toe. In overhead welding, a bead that is too large can hang below the joint instead of wetting into both edges. Keep practice beads short until you can control the puddle shape.
Repair Judgment
On non-critical practice material, overlap is a useful teaching mark. You can grind it out, adjust your settings, and compare the next bead. On a real job, the repair decision depends on the material, joint, load, code, and inspection requirements.
If the weld carries weight, holds pressure, supports a vehicle, repairs a trailer, or affects workplace safety, do not rely on beginner judgment. The defect may need removal by grinding, gouging, or another approved method before rewelding under the correct procedure.
Practice Drill
Run three short beads on clean scrap. Make the first bead slightly slow, the second with a steadier travel speed, and the third with better toe control. After cooling, brush the beads and look at both edges.
Use a marker to circle any lip that looks rolled over. Then write down the setting, travel speed, angle, and position. This simple drill helps you connect the bead shape with the change that caused it.
Good notes make troubleshooting faster. Record wire size, rod type, material thickness, polarity, and whether the bead was flat, horizontal, vertical, or overhead. If the next bead improves, you will know which change was responsible.
Checklist Before Rewelding
- Is the overlapped metal removed where required?
- Is the base metal clean and visible?
- Are settings suitable for the material thickness?
- Is the bead size small enough to control?
- Is the arc aimed at the weld toe?
- Is travel speed steady?
- Was slag removed between passes?
- Does the job need qualified inspection?
Common Beginner Mistakes
- Trying to make the weld look bigger instead of fused.
- Moving slowly because a larger bead feels stronger.
- Adding too much filler in TIG welding.
- Dragging a cold puddle across the joint.
- Ignoring the toe of the weld while watching only the center.
- Practicing on dirty metal and blaming the machine.
- Grinding the surface smooth without removing the defect.
- Using beginner practice results on critical repairs.
When Visual Inspection Is Not Enough
Visual inspection can identify many overlap problems because overlap is often a surface defect. Still, surface appearance does not prove the rest of the weld is sound. If the weld also has poor fusion, cracking, porosity, or slag problems, deeper inspection may be needed.
Critical welds may need testing or inspection required by the job, procedure, or code. A beginner should not approve structural, vehicle, pressure, lifting, or safety-related welds by appearance alone.
Safety Notes
Fixing overlap can involve grinding, gouging, rewelding, sharp edges, hot metal, sparks, fumes, UV radiation, electric shock, and fire risk. Wear proper PPE, control sparks, keep flammables away, and use ventilation or fume control.
Read the machine manual and do not weld unknown containers, coated metals, galvanized material, or safety-critical parts without proper training. For safety references, review OSHA welding hazards guidance, OSHA welding, cutting, and brazing requirements, and AWS safety resources.
FAQ
What is overlap in welding?
Overlap is a defect where weld metal rolls over the base metal without properly fusing at the edge of the weld.
What causes overlap in a weld?
Common causes include travel speed too slow, low heat for the bead size, wrong angle, too much filler, a large puddle, poor position control, and dirty metal.
Is overlap a serious welding defect?
Yes, it can be serious because the overlapped edge may not be fused. On important welds, it needs proper repair and inspection.
Can you fix overlap by grinding?
Grinding may remove the visible lip, but it is not a full fix if unfused metal remains. The defective area must be removed and repaired correctly when strength matters.
How do beginners prevent overlap?
Use clean metal, suitable settings, steady travel speed, correct angle, controlled bead size, and watch that the weld toes wet into the base metal.
Final Advice
Overlap in welding is a warning that the puddle did not tie in correctly at the edge. Learn to spot the rolled toe, then correct the cause before making the next bead. For real repairs, remove the defect and use proper inspection instead of trusting a smooth surface.