How to Hold a TIG Welding Torch
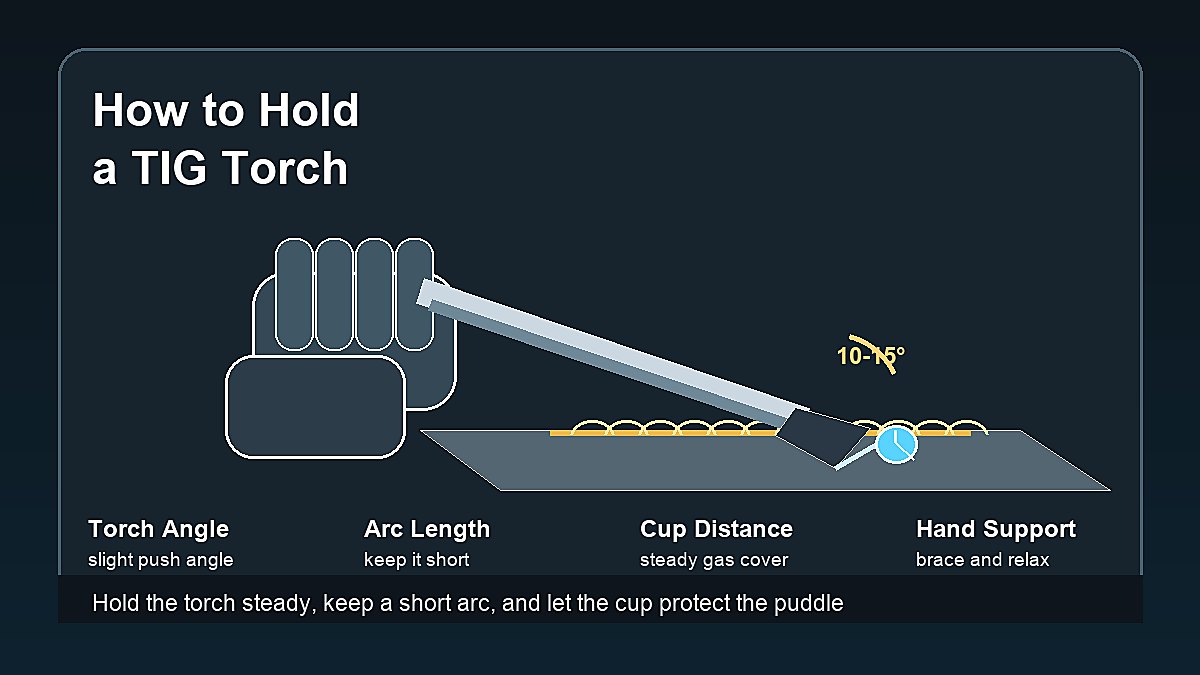
If you want to learn how to hold a TIG welding torch, start with comfort before speed. Brace your hand, keep the torch angle controlled, hold a short arc, and move smoothly enough that the weld pool stays protected by shielding gas.
TIG welding feels difficult when the torch hand floats in the air, the arc length changes every second, or the cup drifts too far from the work. A steady torch position makes the puddle easier to see, helps the tungsten stay clean, and gives the filler rod a better target.
Mark Dawson beginner note: most beginner TIG problems are not only machine settings. A shaky torch, long arc, or poor body position can make good settings behave badly.
Quick Answer
Hold a TIG welding torch like a steady writing tool: support your hand, angle the torch slightly in the direction of travel, keep the tungsten close to the work without touching, and keep the cup close enough for gas coverage. Use your wrist, fingers, or a prop to stabilize the torch, then feed filler rod into the front edge of the puddle while keeping the rod inside the shielding gas.
| Control Point | Beginner Target | Why It Matters |
|---|---|---|
| Torch angle | Slight push angle | Helps gas cover and puddle view |
| Arc length | Short and steady | Improves control and bead shape |
| Cup distance | Close, not dragging | Keeps shielding gas over the puddle |
| Hand support | Brace whenever possible | Reduces wobble and tungsten dips |
| Filler rod | Dip at front edge | Adds metal without contaminating tungsten |
Why Torch Position Matters
The TIG torch controls heat direction, arc length, gas coverage, and puddle visibility. Small movements at the torch can change the bead more than beginners expect. A long arc can widen the heat, make the arc wander, and increase the chance of contamination. A poor angle can push shielding gas away from the puddle.
Good torch position also protects the tungsten. Dipping the electrode into the puddle or touching the filler rod can instantly change the arc. When that happens, stop and regrind the tungsten instead of trying to weld through the problem. For the prep side, read How to Grind Tungsten for TIG Welding.
Set Your Body Before You Strike an Arc
Body position comes first. Sit or stand where you can see the joint, move along the weld path, and reach the end without stretching. If your shoulder is already tight before the arc starts, the torch will usually shake more as you move.
Place the work where the joint is visible under the helmet. Keep your elbows close enough to control the torch, and avoid leaning on hot or sharp material. Dry-run the movement once with the machine off so you know your hand can travel the full bead length.
Beginners often start too far from the weld or angle their head awkwardly. Better setup makes TIG welding calmer. For broader practice habits, use Basic TIG Welding Techniques for Beginners.
Brace the Torch Hand
A braced hand is easier to control than a floating hand. Rest the side of your hand, wrist, or a gloved finger on a safe part of the workpiece or table when possible. If the work is hot, use a prop, TIG finger-style heat shield, or another stable support that keeps your glove away from direct heat.
Some welders hold the torch like a pencil for small work. Others use a palm grip for longer beads or awkward positions. The correct grip is the one that lets you keep the tungsten steady, maintain angle, and move without twisting your wrist into a weak position.
Practice without filler first. Run short bead-on-plate passes and watch the arc length. Once the torch hand is steadier, add filler rod practice. Trying to learn both hands at full speed on day one usually creates frustration.
Choose a Grip That Fits the Joint
A pencil-style grip works well for small parts, thin material, and short beads where finger control matters. Hold the torch lightly enough that your fingers can make small corrections, but firmly enough that the torch does not roll as you move.
A palm grip can feel better on longer practice beads or heavier work. It gives the hand more contact with the torch body and can reduce finger fatigue. The tradeoff is that tiny movements may feel less precise until you practice.
Awkward joints may need a different torch head angle, different cup size, or a shorter tungsten stickout. Do not force your wrist into a painful angle just to copy a photo. Adjust the work position when possible, then choose the grip that keeps your hand relaxed and your view clear.
Control the Torch Cable
The torch cable can quietly ruin control. If the cable hangs off the table or pulls from behind your wrist, it can drag the torch away from the joint. Lay the cable so it has slack and does not fight your hand during the bead.
Some welders loop the cable over a shoulder or rest it on the table to remove weight from the torch hand. Keep the cable clear of hot metal, sharp edges, sparks, and the weld path. If the cable shifts during welding, pause and reset instead of wrestling it while the arc is live.
Torch Angle for TIG Welding
For many flat-position beginner welds, hold the TIG torch with a slight push angle in the direction of travel. A small angle helps you see the puddle and keeps the shielding gas flowing over the hot metal. Too much angle can stretch the arc, disturb gas coverage, and make the bead uneven.
As a starting point, think of the torch as nearly upright with a small lean. Keep the tungsten aimed at the leading edge of the puddle. If the torch leans too far, the arc may heat one side more than the other and the cup may stop protecting the weld properly.
Joint type changes the angle. A lap joint, outside corner, T-joint, or butt joint may need a different torch position. The goal is not a single magic number; it is a stable arc, clear puddle view, and even tie-in on both sides of the joint.
Tungsten size also affects how easy torch control feels. A tungsten that is too small for the amperage can overheat and make the arc less predictable, while an oversized tungsten can feel sluggish at low amperage. If you are unsure, review How to Choose the Right Tungsten Electrode Size.
Keep a Short Arc Length
Arc length is the distance between the tungsten tip and the workpiece. In TIG welding, shorter and steadier is usually better for beginner control. A long arc can make the heat spread out, reduce precision, and make the puddle harder to manage.
Keep the tungsten close without touching. If you keep dipping the tungsten, slow down and improve hand support. Do not solve repeated dips by holding a very long arc. That usually trades one problem for several new ones.
Arc length should stay consistent as you travel. Watch the gap, not only the bright arc. If the gap grows and shrinks, the bead width and heat input will change along the weld.
A simple check is to pause after each practice bead and look at the shape. Uneven bead width often means the torch distance changed. One side washed out more than the other usually means angle or aim changed during travel.
Cup Distance and Tungsten Stickout
The ceramic cup directs shielding gas around the tungsten and weld pool. Keep the cup close enough that gas coverage remains stable, but do not drag the cup across the puddle unless you are using a specific cup-walking technique on suitable work.
Tungsten stickout is how far the electrode extends past the cup. Too much stickout can reduce gas coverage unless your torch setup is designed for it. Too little stickout can make it hard to see the puddle or reach the joint. Gas lens setups often allow more stickout than a basic collet body.
Cup size, gas flow, stickout, and torch angle all work together. If you see oxidation, black soot, or a rough-looking bead, check shielding gas setup as well as hand position. For gas basics, read What Gas Do You Use for TIG Welding?.
Where to Put the Filler Rod
Keep the filler rod low and in front of the puddle. Dip the rod into the leading edge of the puddle, then pull it back slightly while keeping the hot end inside the shielding gas. Do not jab the filler into the tungsten or wave it far away from the gas shield between dips.
The filler hand should be relaxed. Feed the rod in small movements rather than big lunges. If the filler rod keeps sticking, the puddle may be too cold, the rod may be too large, or your timing may be early.
For practice, try moving the torch without filler, then feeding filler without welding, then combining both. Breaking the skill into pieces helps you find which hand is causing the problem.
Coordinate Torch, Filler, and Foot Pedal
If your machine uses a foot pedal, the torch hand still needs to stay steady while your foot controls heat. Beginners sometimes press harder on the pedal when the puddle does not respond, then speed up the torch to catch up. That creates an uneven bead.
Start with short beads. Bring the puddle in, add filler, move slightly, and repeat. If the puddle grows too wide, ease off the heat or increase travel speed slightly. If it freezes before filler wets in, add a little heat or slow the movement.
Keep both hands in rhythm. The torch leads, the filler rod follows the front edge of the puddle, and the pedal fine-tunes heat. This rhythm matters more than trying to make a perfect stack-of-dimes look during early practice.
Beginner Practice Drill
- Clamp clean mild steel flat on the table.
- Dry-run the torch path with the machine off.
- Brace your wrist or hand safely.
- Set a short tungsten stickout for easy control.
- Start a small puddle without filler.
- Move slowly while keeping the arc length steady.
- Add filler only after the torch hand feels stable.
- Stop and regrind if the tungsten touches the puddle.
Common Torch-Holding Mistakes
- Holding the torch too far from the work.
- Floating the torch hand with no support.
- Leaning the torch too far and losing gas coverage.
- Changing arc length throughout the bead.
- Pulling the cup away before post-flow ends.
- Dipping filler rod into the tungsten.
- Trying to weld too long before repositioning.
- Ignoring body position and blaming amperage first.
Troubleshooting Torch Control Problems
Arc wandering often starts with arc length, tungsten condition, or torch angle. Check the point, shorten the arc, and make sure your hand is supported. If the tungsten is contaminated, regrind it before continuing.
A wide, washed-out bead can come from moving too slowly, using too much amperage, or holding the arc too long. A narrow rope-like bead may mean low heat, fast travel, poor filler timing, or weak puddle development.
Black edges or dull color may point to shielding gas trouble, dirty metal, too much torch angle, or moving the torch away too soon after stopping. Let post-flow protect the hot tungsten and weld area.
Safety Notes
TIG welding can expose you to UV radiation, hot metal, electric shock, shielding gas hazards, fumes, fire risk, and burns. Wear a proper welding helmet, gloves, flame-resistant clothing, and safety glasses for prep and cleanup. Keep the work area ventilated and free of flammable material.
Do not brace bare skin near hot metal, and do not rest gloves where they can burn through. Keep the torch cable arranged so it does not pull your hand off line. Review OSHA welding hazards guidance, OSHA welding, cutting, and brazing requirements, and AWS safety resources.
FAQ
What angle should I hold a TIG torch?
For many beginner flat welds, hold the torch nearly upright with a slight push angle in the direction of travel. Adjust for joint type, visibility, and gas coverage.
How close should the tungsten be to the work?
Keep a short, steady arc without touching the work. The exact gap depends on tungsten size, joint access, and technique, but beginners should avoid long arc length.
Should I push or pull a TIG torch?
TIG is commonly done with a slight push angle so the gas covers the hot puddle and the welder can see the leading edge. Extreme torch angles can cause problems.
Why do I keep dipping the tungsten?
Common causes include poor hand support, arc length that is too short for your control level, rushing the filler rod, awkward body position, or trying to weld too long without repositioning.
Can I rest the TIG cup on the metal?
Some techniques use cup contact or cup walking, but beginners should first learn steady freehand control. Avoid dragging the cup through contamination, hot puddles, or positions that disturb shielding gas.
Final Advice
Good TIG torch control starts before the arc. Set your body, brace your hand, keep a short arc, use a slight torch angle, and let the shielding gas protect the puddle. Once the torch hand is steady, filler rod timing becomes much easier to learn.